
Turn Boring Spaces Beautiful: Put a cork on it
 CREDIT: BRITTANY ROACH
Get inspired with your very own custom cork board.
It's that time of year again when you sit down and list out all your goals you dream to accomplish throughout the next 12 months. Some people like to write out a list of goals, while others get a little creative by putting together inspiration collages of everything they want to achieve. This year, let's take the classic inspiration collage and turn it into a custom inspiration board!
A few weeks ago, I found myself wanting to create something a little different for 2014 to display all my goals, inspirations and wishes for the year. If you're anything like me, then you want funky finds to spice up your living space, but sometimes finding out-of- the-ordinary pieces in retail stores can be tough. I decided to make my own customer cork board for all my inspirations and goals, and here's all you need to do to get cracking on your own custom cork board:
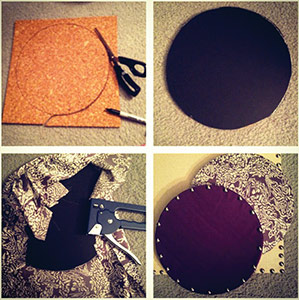
First you need to choose the shape of the board. I choose a circle (note: this is not the easiest shape to perfect). Once you have chosen your shape, the next step is to draw and cut it out of your piece of cork, which you can get from a department store like Walmart.
The next step is to cut the exact same shape out of foam core to glue it to the back of the cork. The foam core will give the cork more stability and make your board firm while pinning pictures to it. Once I glued the two pieces together, I set a book on top of it for 24 hours to let it set.
When your glue is all nice and dry, it is time for the fun part: stapling the fabric on to the foam core side! Using a staple gun is the best way to ensure your fabric is properly secured. Another thing to note: make sure your staples don't pop all the way through your foam core and through your cork side — they could rip your pretty fabric! Once the fabric is stapled, cut off any extra fabric on the back of the board.
Once all of your fabric is secured on, you can add a little bling! I used furniture pins from Canadian Tire to frame the outside of my boards.
Now it's time to add all of your wishes, dreams, goals and inspirations pictures to your board!
When stores don't have exactly what you're looking for, create it yourself. Enjoy creating your own custom inspiration board!
I wish you all the best in achieving your new list of goals for 2014! Remember, never settle for the ordinary!